

Audience: Client-side Genesys Cloud administrators
Applies to: TrueEngage agent application integration with Genesys Cloud
Overview
The TrueEngage agent application authenticates against your Genesys Cloud organization using an OAuth client with the Code Authorization / PKCE grant type. This client must exist in your Genesys Cloud org (Admin > Integrations > OAuth) and be configured exactly as described below. If any of these values are missing or incorrect, agents will be unable to log in to the TrueEngage application, or certain features (conversation history, notifications, agent profile info) will fail silently or return authorization errors.
This OAuth client is created automatically during installation of the TrueEngage integration - clients do not need to create it manually. This article documents its required configuration so it can be verified, or re-created if it's ever accidentally modified, deleted, or needs to be rebuilt from scratch.
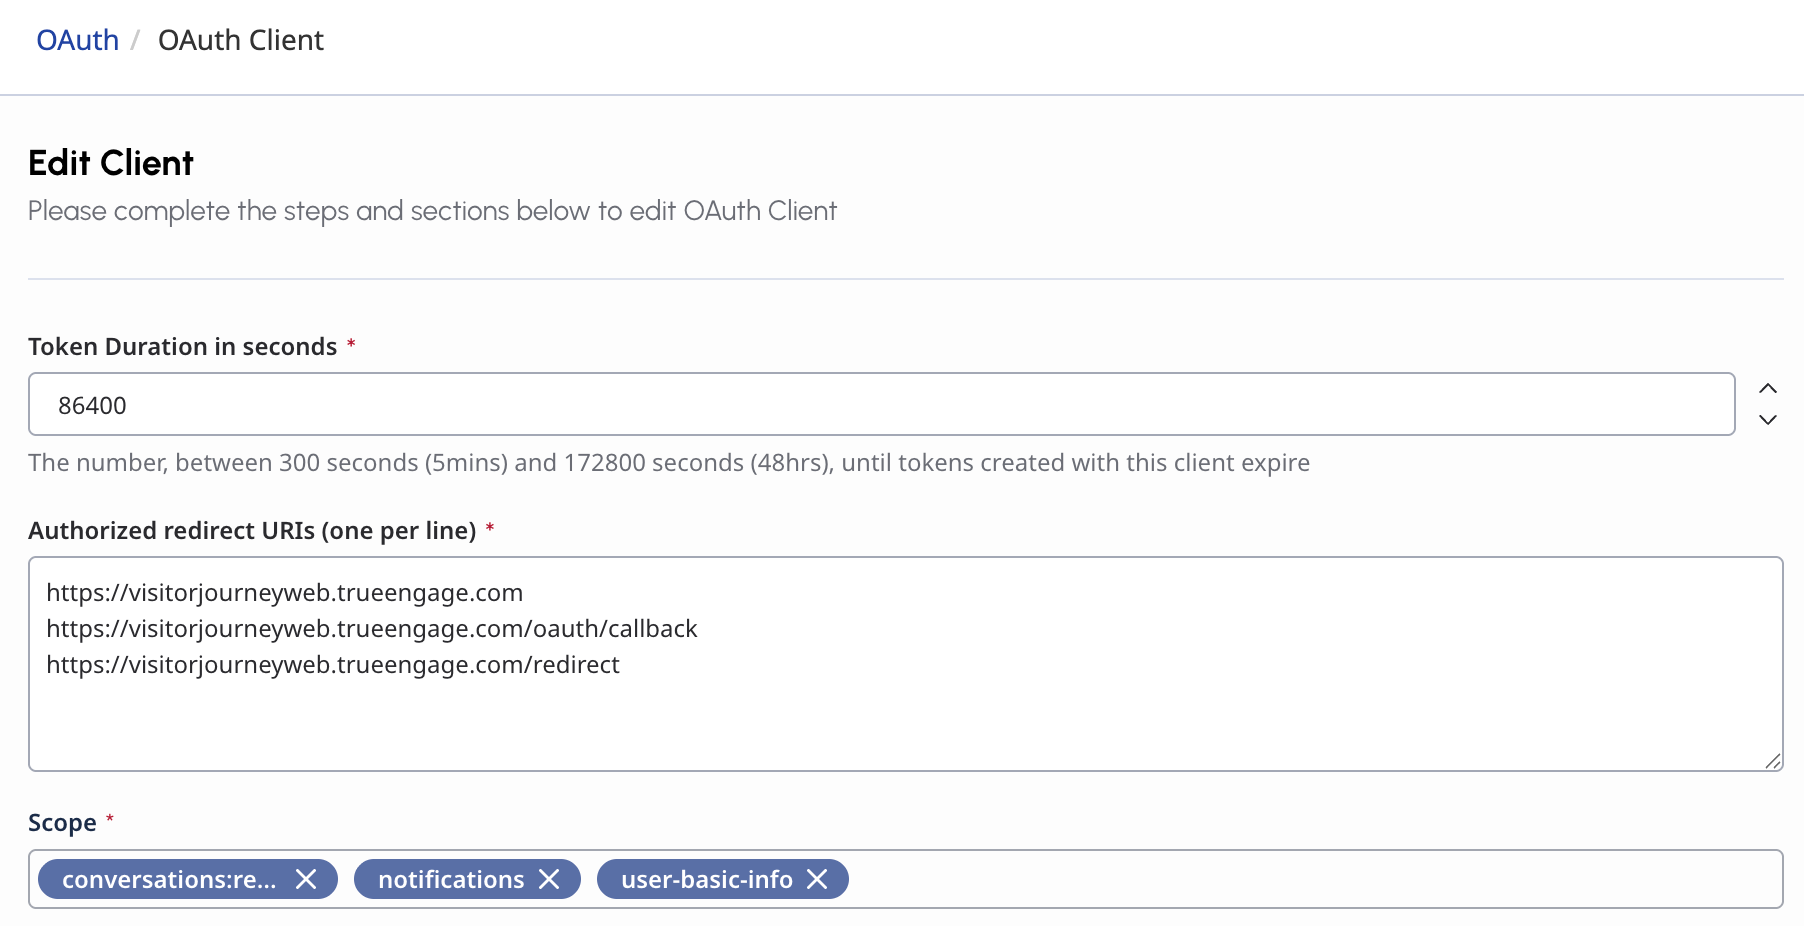
1. Client name
The client is always created with the fixed name:
TrueEngage_AppClient This name is set automatically by the installer and should not be changed — it's used to identify the client during support troubleshooting.
2. Grant type
Code Authorization / PKCE
This is required — the TrueEngage agent application is a browser-based client and cannot securely hold a client secret, so it relies on the PKCE flow to complete authentication.
3. Token duration
86400 seconds (24 hours) This is our recommended default, balancing agent session convenience against security best practice. It can be adjusted between 300 seconds (5 min) and 172800 seconds (48 hrs) if your organization has a specific session policy, but going below the default may cause more frequent re-authentication prompts for agents.
4. Authorized redirect URIs
All three of the following URIs must be present, one per line:
https://visitorjourneyweb.trueengage.comhttps://visitorjourneyweb.trueengage.com/oauth/callbackhttps://visitorjourneyweb.trueengage.com/redirect
Each of these corresponds to a different stage of the login/redirect flow used by the application. Missing any one of them will cause the OAuth redirect to fail with a "redirect URI mismatch" style error after the agent authenticates.
5. Scopes
Exactly three scopes are required:
| Scope | Purpose |
|---|---|
conversations:readonly |
Allows the app to read conversation data (interaction history, active conversations) |
notifications |
Allows the app to subscribe to real-time Genesys Cloud notification channels |
user-basic-info |
Allows the app to read the logged-in agent's basic profile information |
Do not add additional scopes beyond these three — the application only requests and uses these, and adding others unnecessarily widens the access footprint of the client (relevant for our clients' own security/compliance reviews).
How to verify or edit this OAuth client
- Log in to Genesys Cloud as an admin.
- Navigate to Admin > Integrations > OAuth.
- Locate the client named
TrueEngage_AppClient. - Click into the client to open Edit Client.
- Compare each field against the values above.
When this article matters
Re-check this configuration if:
- Agents suddenly cannot log in to the TrueEngage application.
- Agents can log in but conversation history, notifications, or profile info aren't loading.
- Your organization is rotating/regenerating OAuth clients as part of a security review.
- Someone on your team accidentally edits or deletes this client.
If the client needs to be recreated from scratch, use the exact values in this article. If you're unsure whether a change is safe, contact TrueEngage support before modifying scopes or redirect URIs, since incorrect values can break login for all agents in your organization.